How to Make Ankle Boots
How to Make Ankle Boots – Step-by-Step Shoemaking Guide
Ankle boots are a wardrobe staple — stylish, durable, and perfect for year-round wear. Whether you're aiming for classic leather boots or something more modern, making ankle boots by hand is a great way to challenge your shoemaking skills and create something that lasts.
In this guide, I’ll walk you through how to make your own ankle boots, from choosing the right materials to assembling the upper and attaching the sole and heel.
Creating a pair of ankle boots requires a balance of technique, structure, and attention to detail.
👉 In my Online Shoemaking Course, I teach you step-by-step how to make Ankle Boots, from patternmaking to crafting the final shoes. If you want to take your skills to the next level, check it out!
1. Understanding the Ankle Boot Design
Ankle boots cover the foot and reach just above the ankle, offering a balance of coverage and mobility. They can be sleek and dressy or rugged and functional, depending on your pattern and materials.
Key Features of an Ankle Boot:
- Mid-height upper that covers the ankle
- Side opening (zip, elastic, laces, or pull-on)
- Reinforced structure at heel and toe
- Durable sole and optional stacked heel
Common Ankle Boot Styles Include:
-
Chelsea Boots – Elastic side panels, easy pull-on

-
Lace-Up Boots – Classic and adjustable

-
Zipper Boots – Clean design with easy on/off

-
Western or Block Heel Boots – Stylish and bold

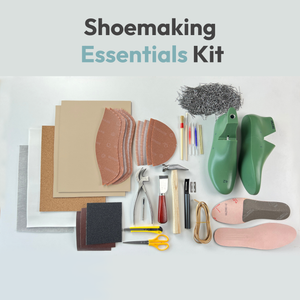
2. Tools and Materials You’ll Need
Making ankle boots calls for a few essential shoemaking tools and strong materials for support and wear resistance.
Tools:
-
Lasting pincers

-
Shoemaking hammer

-
Leathercraft tool knife

-
Leather Safety Beveler

-
Hole punch for eyelets

-
Marking pens for leather

-
Iron nails for hand lasting

Materials:
- Leather or suede for the upper

- Lining leather ( goat, cow, pig)
- Texon or leather insole board

- Toe puff and heel counter

- Rubber or leather outsole
- Heel block (flat or stacked)
- Thread, adhesive, zippers, elastic, or laces
You can find many of these tools and materials in my shop if you’re looking for professional-grade supplies:
👉 Shoemaking Tools and Materials
3. Creating the Boot Pattern

Boot patterns must account for the height, ankle movement, and any closures (zip, elastic, or lace).
Every great Ankle Boot starts with a precise and well-crafted pattern. If you're not ready to draft one from scratch, you can use pre-made digital patterns available in all 9 sizes, ready to print on A4 or Letter paper.
👉Pre-made patterns
Alternatively, you can learn how to design your own patterns step by step in my dedicated patternmaking course. By the end, you’ll have the skills to create patterns for any type of shoe.
👉Footwear patternmaking course
Steps:
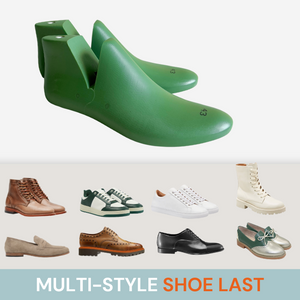
- Choose a last appropriate for boots — higher ankle, strong heel.
- Print or draft your pattern with seam allowances and closure adjustments.
- Mark zipper or elastic placement (if applicable).
4. Cutting the Leather and Preparing the Upper

Now it’s time to prepare your leather or suede pieces. Boot leather should be durable but still pliable for shaping.
Steps:
- Lay out and trace the pattern pieces onto your leather.
- Cut all components for the upper, lining, and reinforcements.
- Skive the edges for folding and smooth seams.
- Cut slots or punch holes for eyelets, zippers, or elastic panels.
- Pre-assemble decorative elements or side panels if needed.
5. Assembling the Upper

This is where your boot takes shape, piece by piece.
Some of the Steps:
- Stitch or glue the lining to the upper pieces.
- Close the back seam and sew together vamp and quarters.
- Insert reinforcements like toe puffs and counters.
- Install zippers or elastic side panels (for Chelsea boots).
- Add pull tabs or loops if included in your design.
6. Lasting the Boot Upper

Ankle boots must be lasted carefully to form the shape and support the structure.
Steps:
- Position the upper over the last and pull it tight using pincers.
- Secure the upper to the insole board using tacks or adhesive.
- Shape around the toe and heel firmly.
- Allow time for the upper to set and dry fully on the last.
7. Adding the Sole and Heel
Boot soles need to be sturdy and well-aligned for comfort and longevity.
Steps:
- Cut and prep your leather or rubber outsole.
- Cement or stitch the sole to the lasted upper.
- Trim and sand the sole edges.
- Attach the heel block or stacked layers.
- Add a rubber top lift for grip and wear resistance.
8. Final Touches and Finishing
Your boots are nearly complete! Add these finishing touches to elevate them to a professional level.
Steps:
- Dye or burnish sole edges
- Polish and condition the leather
- Clean any glue or rough seams
- Lace or zip them up — and try them on!
🥾 Ready to Craft Your Own Ankle Boots?
Ankle boots are a satisfying and stylish project — and once you make your first pair, you’ll want to create them in multiple styles and leathers.
👉 Want to master this craft with full support? Join my step-by-step Online Shoemaking and Patternmaking Course
You’ll get access to printable patterns, video tutorials, and everything you need to make your own custom ankle boots!