How to Make Sandals
How to Make Sandals – A Step-by-Step Shoemaking Guide
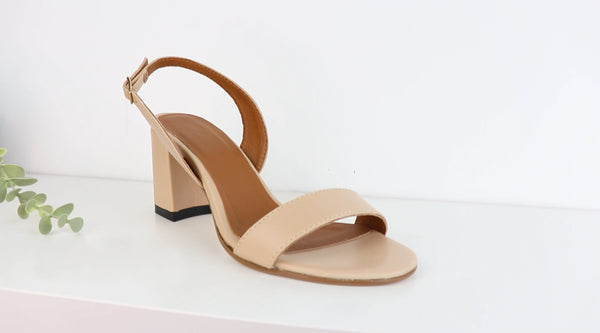
Sandals are one of the oldest and most versatile types of footwear. From minimalist leather flats to stylish high-heeled designs, they offer a perfect balance between comfort, style, and breathability. Whether you're creating a casual everyday pair or an elegant heeled version, sandals are a great project for both beginners and experienced shoemakers.
In this guide, I’ll walk you through each step of making your own sandals — from selecting the materials to attaching the sole and finishing the details.
Making sandals by hand is a rewarding process that combines creativity, precision, and craftsmanship.
👉 In my Online Shoemaking Course, I teach you step-by-step how to make Sandals, from patternmaking to crafting the final shoes. If you want to take your skills to the next level, check it out!
1. Understanding Sandal Design
Sandals are defined by their open design and strap-based upper, making them ideal for warmer climates and minimalist footwear lovers. Depending on your design, sandals can be flat or include various heel heights.
Key Features of a Sandal:
- Open structure for breathability and comfort
- Upper made from straps, panels, or a combination
- Flexible or structured sole depending on the use
- Can be built as flat, mid-heel (3–6 cm), or high-heel (7–11 cm)
Common Sandal Types:
-
Flat Sandals – Simple, everyday comfort

-
Block Heel Sandals – Stylish and supportive

-
Strappy Heels – Elegant high-heel sandals for formal occasions

-
Slide Sandals – No ankle support, just a vamp strap over the foot

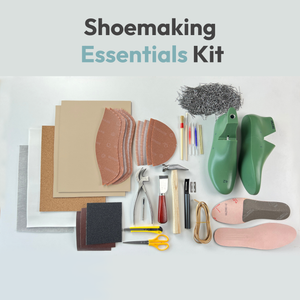
2. Tools and Materials You’ll Need
To make high-quality sandals, you'll need a few essential tools and materials. Here's a basic checklist:
Tools:
- Shoemaking hammer

- Leather cutting knife

- Skiving tool

- Hole punch (round or slot)
- Last (flat or heeled, depending on your design)
- Adhesive (contact cement or neoprene)
- Lasting pincers (for heeled sandals)

-
Marking pens for leather

Materials:
- Leather (or vegan alternative) for straps and insole lining

- Foam or cork padding (optional for comfort)
- Texon board or leather for insoles
- Outsoles (rubber or leather)
- Heel blocks (3–11 cm) if making heeled sandals
- Buckles, rivets, or Velcro closures
- Thread or waxed cord (for decorative stitching)
3. Creating the Sandal Pattern

Every pair of sandals starts with a well-planned pattern. Since sandals don’t have a full upper like closed shoes, precision in strap placement and shape is key.
If you're not ready to draft one from scratch, you can use pre-made digital patterns available in all 9 sizes, ready to print on A4 or Letter paper.
👉Pre-made patterns
Alternatively, you can learn how to design your own patterns step by step in my dedicated patternmaking course. By the end, you’ll have the skills to create patterns for any type of shoe.
👉Footwear patternmaking course
Steps:
- Choose the last that matches your desired heel height and foot shape.
- Print and cut the pattern on A4 or US Letter paper.
- Adjust strap lengths and positions if needed.
- Make sure your pattern includes seam allowances and reinforcements.
4. Cutting the Leather and Preparing the Upper
Once your pattern is ready, it’s time to cut the leather or upper material. This step sets the foundation for a clean finish.
Steps:
- Lay the pattern pieces on the leather and align with the grain.
- Cut accurately using a sharp utility or shoemaking knife.
- Skive the strap edges to reduce bulk if folding.
- Add decorative elements like punched holes, embossed logos, or stitching if desired.
5. Assembling the Upper
Now you’ll start building the upper structure of your sandal — mainly the strap placement and closure system.
Some of the Steps:
- Attach lining to the main straps, if needed.
- Stitch folded edges or topstitch for decorative effect.
- Position and glue straps onto the insole board (with or without a sock lining).
- Secure straps by stitching, riveting, or using buckles/fasteners.
- For ankle-strap sandals, punch holes and install buckles or D-rings.
6. Lasting the Sandal (if needed)

For flat sandals, lasting is often minimal — straps are mounted directly onto the insole.
For medium or high-heel sandals, lasting helps shape the upper over the arch and heel.
Steps:
- For heeled sandals, place the upper on the last.
- Use pincers to stretch and tack the straps into position.
- Secure with adhesive and let dry.
- Ensure straps are snug but not overly tight.
7. Adding the Sole and Heel

This is where your sandals get their final structure and function.
Steps:
- Apply adhesive to the bottom of the insole and the outsole.
- Press together firmly and let dry under weight or clamp.
- Trim and sand the edges of the sole for a clean finish.
- If adding a heel (3–11 cm), cement the block heel in place.
- Add a rubber top lift for durability and traction.
8. Final Touches and Finishing
This is the stage where everything comes together. A few finishing touches will make your sandals look polished and professional.
Steps:
- Edge dye or burnish for clean, dark borders
- Clean and condition leather
- Add a cushioned insole if needed
- Double-check all straps for tightness and security
- Try them on and make minor adjustments for comfort
👡 Ready to Make Your Own Sandals?
From simple flats to elegant heels, sandals are a great starting point in shoemaking — and a satisfying style to master. You’ll enjoy the process of creating something both beautiful and wearable.
👉 Ready to learn step-by-step with professional guidance?
Join my full Patternmaking and Shoemaking Online Course and make your own sandals, boots, sneakers and more with confidence!